Hey, welcome back to Mr.Blog421! In this module, we are gonna see the layout in HTML.
Let's start...
Layout in HTML
HTML layout: headings, paragraphs, and lists
Let’s start with…
► Headings
In this HTML layout module, we are having our first topic headings. To use headings in your HTML page you need to use the heading tags according to the level of heading you want on your page. In HTML, there are 6 levels of headings and here are the six heading tags:
<h1>….</h1><h2>….</h2><h3>….</h3><h4>….</h4><h5>….</h5><h6>….</h6>
Let’s see it practically:
<!DOCTYPE html>
<html lang="en">
<head>
    <meta charset="UTF-8">
    <meta http-equiv="X-UA-Compatible" content="IE=edge">
    <meta name="viewport" content="width=device-width, initial-scale=1.0">
    <title>Heading tags</title>
</head>
<body>
    <h1>This is text written in h1 tag and level of the heading is 1.</h1>
    <h2>This is text written in h2 tag and level of the heading is 2.</h2>
    <h3>This is text written in h3 tag and level of the heading is 3.</h3>
    <h4>This is text written in h4 tag and level of the heading is 4.</h4>
    <h5>This is text written in h5 tag and level of the heading is 5.</h5>
    <h6>This is text written in h6 tag and level of the heading is 6.</h6>
</body>
</html>
The output of the code:

Now, I think you are clear with heading tags and levels of heading in HTML. I would like to give you one recommendation about heading levels that are, use only once the heading tag <h1>…</h1> (level 1st of heading), this is so helpful to rank your webpage by SEO. Otherwise, you can use other tags and increase the font size of the headings.
One more important thing about heading tags is, these all the tags are block-level of tags. Later in upcoming modules, we’ll discuss block-level and inline-level elements and tags. For now block level of tags/elements are those tags/elements, which are making one line down to the next element but inline isn’t having this property, see through codes:
<body>
<h1>This is text written in h1 tag and level of the heading is 1.</h1>

<h2>This is text written in<span> h2 tag</span> and level of the heading is 2.</h2>
</body>

Here h1 and h2, both are block-level of elements, that why h1’s content is in line no. 1st and h2 is in line no. 2nd, but see that I have used one more tag inside the h2 tag and the tag is <i>…</i>, behind the scene, <i> is an inline element, there is no line change like h1 and h2 tags.
► Paragraphs
Now it's time to know the tags that are used for paragraphs and the tag is <p>….</p>, as in headings there are no levels in paragraphs. The paragraph is also a block-level tag. Let’s see through the codes:
<body>
<h1>This is text written in h1 tag and level of the heading is 1.</h1>
<p> This is the paragraph tag and you can write a long paragraph inside this tag.</p>
<p> This second paragraph, starting with the second line, that's why <p> tag is also block level.</p>
</body>

I hope you are done with headings and paragraphs, it’s time to move to lists.
Lists in HTML
There are three types of lists in HTML:
Ordered list
Unordered list
Description list
► Ordered list
Assume you wanna create a list of applications, you use mostly. In an ordered list, the list of items will be defined with the numbers. First, see the code and then look for the explanation, given below -
<body>
<h1>Here is the list of apps, I use mostly on my phone</h1>
<ol>
<li>Spotify</li>
<li>Twitter</li>
<li>WhatsApp</li>
<li>Instagram</li>
<li>Hashnode</li>
<li>Telegram</li>
<li>Linkedin</li>
<li>Gmail</li>
<li>GeeksForGeeks</li>
<li>FreeCodeCamp</li>
</ol>
</body>

In the code there are two types of tags are used one is used to contain the items and the second is used to define the items separately. Here, <ol>………</ol> is used to contain the <li>….</li> items.
<ol> stands for ordered list means, all the items defined inside <ol> tag are listed with numbers.
<li> stands for list item and is used to define an item for the list. By using attributes like list-style-type/list-style we can customise the list, let's see through an example:
<body>
    <h1>Here is the lists of apps, I use mostly in my phone</h1>
    <ol style="list-style: lower-alpha;">
        <li>Spotify</li>
        <li>Twitter</li>
        <li>WhatsApp</li>
        <li>Instagram</li>
        <li>Hashnode</li>
    </ol>
    <ol style="list-style-type: lower-roman">
        <li>Telegram</li>
        <li>Linkedin</li>
        <li>Gmail</li>
        <li>GeeksForGeeks</li>
        <li>FreeCodeCamp</li>
    </ol>

</body>

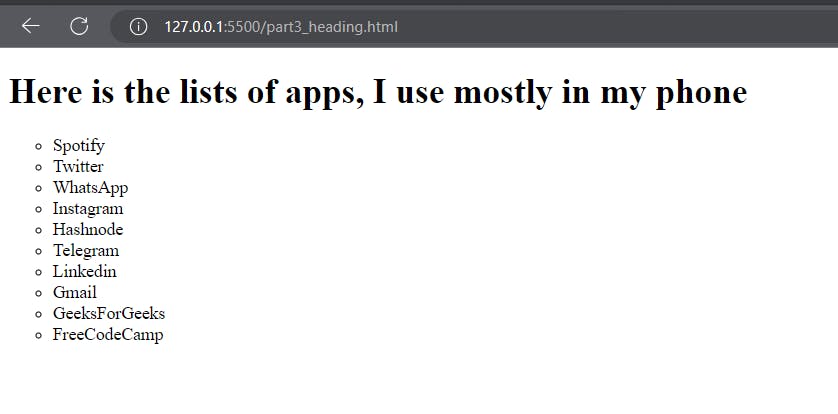
► Unordered list
Now to understand the unordered list, I need to be continued with the last example, and yes, the difference in code is used <ul> tag instead of <ol> tag.
<body>
    <h1>Here is the lists of apps, I use mostly in my phone</h1>
    <ul style="list-style: circle;">
        <li>Spotify</li>
        <li>Twitter</li>
        <li>WhatsApp</li>
        <li>Instagram</li>
        <li>Hashnode</li>
        <li>Telegram</li>
        <li>Linkedin</li>
        <li>Gmail</li>
        <li>GeeksForGeeks</li>
        <li>FreeCodeCamp</li>
    </ul>
</body>

Now, I think you get the difference between an ordered list and an unordered list. And the same attribute with the style tag is used to change the list type.
► Description list
In HTML, a description list is created using the <dl>, <dt>, and <dd> tags. The description list is used to display a list of terms and their corresponding descriptions or definitions. Here's an example of how to create a description list in HTML:
<dl>
  <dt>Term 1</dt>
  <dd>Description 1</dd>

  <dt>Term 2</dt>
  <dd>Description 2</dd>

  <dt>Term 3</dt>
  <dd>Description 3</dd>
</dl>

In the example above:
The
<dl>element represents the container for the description list.Each term is defined using the
<dt>(definition term) element.The corresponding description or definition for each term is enclosed within the
<dd>(description) element.
You can add as many term-description pairs as needed within the <dl> element. This structure allows for clear and semantic representation of terms and their definitions or descriptions.
Hurrah! You have completed this module of the series Web Design Fundamentals: An HTML Primer for Beginners ►►►Click here to go to the next part of this series
After successful completion of this series course, you'll earn a certificate

